
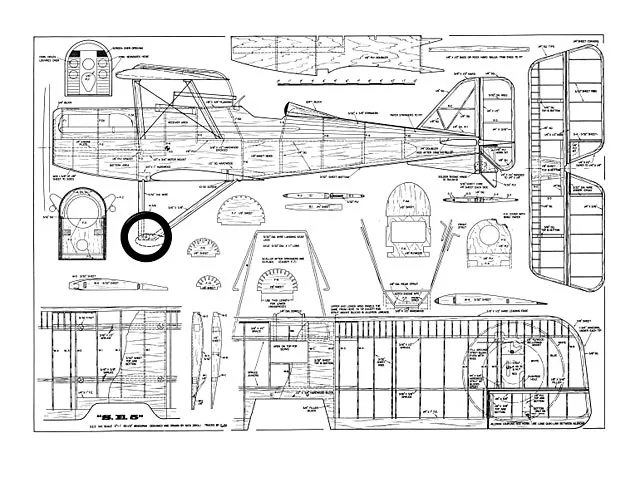
Reading the Plans: What Experienced Builders Look for First
Reading the Plans:
What Experienced Builders Look for First
Kit Cutters—October 15, 2026—From Plans to Flight Line, Post 5
This is the fifth post in the From Plans to Flight Line series. The previous post covered how to use September to prepare for the building season — confirming the project, sourcing materials, and getting the shop ready. By October, the flying season is wrapping up for most northern builders and the bench is coming back. This post covers what to do the moment the plans come out.
The plans are on the table. The materials are sourced. The shop is ready. This is the moment the build actually begins — not when the first piece of wood is cut, but when the builder sits down with the plans and works through them seriously for the first time.
Most experienced builders read a new set of plans at least twice before picking up a knife. Not because the plans are difficult, but because there is a significant difference between knowing what an aircraft looks like and understanding how it goes together. The first read develops orientation. The second read develops understanding. Both happen before the first piece of wood is cut.
A builder who skips this stage — or rushes through it — typically discovers what they missed somewhere in the middle of an assembly they cannot easily undo. The problems that appear at the bench in month three almost always have their origins in the plan-reading stage at the start.
Here is what experienced builders look for, and in what order.
Start with the Big Picture
Before looking at any individual sheet in detail, roll out all the plan sheets and get a sense of the whole aircraft. How many sheets are there? What does the overall scope look like? Where are the main assemblies — fuselage, wing, tail, landing gear — documented?
This orientation step is not about reading details. It is about understanding the geography of the plans before navigating them. A builder who knows that the wing spar detail is on sheet four and the control linkage routing is on sheet six can move between sheets fluidly during the build. A builder who hasn’t done this orientation will spend time hunting for information at the wrong moments.
For large-scale aircraft with multi-sheet plans — and most serious designs have several — this survey usually takes twenty to thirty minutes. It is time well spent.
Verify the Scale Before Anything Else
This step gets skipped more often than it should, and the consequences range from annoying to genuinely expensive.
Plans that have been reprinted, photocopied, or scanned and re-output are not always at the correct scale. A plan sheet that came out of a plotter at 98% of the specified size will produce ribs that are slightly undersized. On a small aircraft that variation may be negligible. On a 100-inch warbird where parts from multiple sheets need to fit together precisely, small scale errors compound.
Before doing anything else, find a dimension on the plans that you can measure independently — a known rib chord length, a fuselage width at a marked station, the distance between two reference points the designer has labeled. Measure it on the plan sheet and compare to the stated dimension. If it matches, proceed with confidence. If it doesn’t, investigate before cutting a single part.
Builders who have received cut files or short kits prepared from incorrectly scaled scans know exactly how much time this step saves. Check once at the beginning.
Understand the Construction Sequence
The construction sequence is one of the most important things a set of plans contains — and it is almost never stated explicitly. The builder has to read it out of the plans by understanding what connects to what and what must therefore exist before the next thing can be built.
The sequence matters because large assemblies constrain each other. If the wing saddle needs to be set before the fuselage is planked, that is information you need before you start the fuselage, not when you reach the planking stage. If the elevator joiner needs to pass through a former before the former is glued in place, the plans may show this clearly but only if you look at the right sheet at the right time.
The way to read a construction sequence is to trace the major structural connections. Follow the main spar from root to tip and note what attaches to it and in what order. Follow the fuselage keel from nose to tail. Understand where the major sub-assemblies — fuselage, wing, tail group — join each other and what that joint requires on both sides.
Builders who have done this before the first cut make different decisions than builders who discover the sequence as they go. They build jigs earlier, leave openings that would otherwise get closed, and do not talk themselves into reassembly work that could have been avoided.
The first read is for orientation. The second read is for understanding. Both happen before the first piece of wood is cut.
Find the Jig Requirements
Most large-scale aircraft require that certain assemblies be built on a flat surface, over the plan, or on a specific jig. Some require building boards. Some require that parts be pinned to the plan itself during assembly to hold alignment while glue cures.
These requirements are usually indicated in the plans, but they are not always obvious on a first read. Look for notes that say “build over plan” or “use building board”. Look for assemblies where the plan shows pin or hold-down positions. Look for complex sub-assemblies that will be difficult to hold square without something to build against.
For the wing in particular, the question of whether to build flat on a board or whether the design calls for any washout or dihedral held during construction needs to be settled before assembly begins, not during it. Get this information from the plans during the reading stage and plan accordingly.
Find the Ambiguous Spots
Every set of plans has at least one section where the designer’s intent isn’t immediately obvious. There will be a joint that isn’t shown from quite the right angle. A control linkage that is clear in one view and obscured in another. A note that refers to a detail on a different sheet without saying which sheet.
Finding these spots during the reading stage — when there is no time pressure and no glue involved — is considerably better than discovering them mid-build. When you find an ambiguity, mark it on the plans in pencil and search the other sheets for clarification. If clarification is not available in the plans themselves, this is when the community research from Post 2 of this series pays off. A builder who has worked through the same plans has almost certainly encountered the same ambiguity and may have documented how they resolved it.
Do not guess at ambiguous details during the build. Work them out during the reading stage when you can take the time to get it right.
The Second Read and Annotation
After a complete first read-through — orientation, scale check, construction sequence, jig requirements, ambiguous spots — set the plans aside for a day if time allows. Then read them again.
The second read is different from the first. With the big picture already in place, the details read differently. Parts that seemed minor on the first pass reveal themselves as structural in ways that were not immediately apparent. Connections between sheets that were not obvious the first time become clear when you already know what you’re looking for.
During the second read, use a soft pencil to annotate. Mark the dimensions you will need to transfer to parts during construction. Circle anything that still needs clarification. Note the sheet number next to any cross-reference between sheets. Mark the position of the center of gravity if it is called out — you will want to find it quickly during the final assembly stage.
These annotations are not permanent changes to the plans. They are a working layer of notes that make the plans more useful as a build reference. Builders who annotate during the reading stage spend less time searching for information during the building stage.
The Takeaway
Time spent with the plans before the build starts is not preparation time separate from the build. It is the first stage of the build itself. The decisions made at the plans table — about sequence, jigs, ambiguous details, and scale verification — shape everything that follows.
A builder who reaches the bench with the plans already understood is a builder who can focus on the construction itself rather than stopping regularly to figure out what comes next. That consistency of momentum is one of the things that separates projects that finish from projects that stall.
Roll out the plans. Take the time. Read them twice. The wood will still be there when you are ready for it.
If you are working from Ziroli plans or another designer in the Kit Cutters catalog, the Buyers Guide pages at KitCutters.com include verified specs from the designer’s plans alongside the full accessory and sourcing list — useful reading alongside the plans themselves as you work through the build stages.
Next in the series: Wood Selection for Large-Scale Builds — November 15, 2026. With the plans understood and the construction sequence clear, the next question is what wood to put where. The November post covers balsa grades, ply selection, and the material decisions that directly affect how the finished model flies.